Dienstag, 5. August 2014

Automate html creation with the linux dash

Overview

This article describes the basic concepts for html generation with the linux dash command interpreter.


Example: Video Collection

The dash command line interpreter can be used to generate video player websites for each video in a directory.

Example: Video Collection
Example Video Collection


Dash commands


for - loop through files

Use the for-command to loop through every file. The example below loops through all mp4-files.
for filename in *.mp4;do echo $filename; done

The for-command can also be used to generate video thumbnails and background-images with a video formats converter.


while - loop through code lines

Use the while-command to loop through every line of a file. The example below will read the html template file template.html and loop trough all its lines and replace the SSI-variable *VARIABLE* by the dash variable $variable. In this example the output file is vidcenter.html.
while read line;do
    line=$(echo $line | sed "s/\*VARIABLE\*/$variable/")   
    echo $line >> "vidcenter.html"
done < "template.html"

Conclusion

'for' and 'while' are handy dash commands for linux to generate html from templates, replace variables and run video converters on the fly.


Montag, 7. Juli 2014

Creating an image histogram with Excel


Introduction

An image histogram


About Histograms

In computer vision and photography histograms show the pixel counts of an image grouped by the brightness. Usually this report is represented as a bar chart.

PATENT INFRINGEMENT WARNING!

This article shows how to load image data into an Excel spreadsheet. The algorithm may be protected by patents in your country.


Loading image statistics into a spreadsheet

Required components

To load image information into Excel these components are required:
  • An excel spreadsheet with macros (*.xlsm)
  • A .Net Framework Wrapper Library (*.dll) which can be generated with Visual Studio 


Installing a wrapper Library (*.dll)

The wrapper library needs to be COM-visible and has to be registered for COM-interop in the Windows registry. It provides access to the System.Drawing.Bitmap object which provides basic image access routines, in particular the GetPixel(int x, int y) method.

Loading the wrapper library with excel macros

In the VBA window of Excel the wrapper library has to be checked as a reference. Then the wrapper class has to be defined as a variable with the New instruction.


Finally the image data can be inserted in a spreadsheet table.


Dienstag, 6. Mai 2014

Sky Observation Tips

Things to consider when observing the sky in European cities

Stars and celestial bodies can be photographed either from your window or from a location outside. The main reason for choosing outside locations is the better visibility of the sky.

If you choose to go outside there are a few things you should keep in mind.

Public nuisance: the use of astronomic equipment in public places may require the authorization of the local authorities. Though its use may disturb others and can lead to your arrest.

Wildlife: if you intend to leave the urban area at night you should try to avoid endangered animals like bears and wolfs, because encounters may cause injury or death. According to internet sources wolfs prefer to travel on streets while bears travel on mountains and fields. Both cut off the way of their prey when it tries to get to the waterhole.

Montag, 28. April 2014

The limits of optical zoom


How image quality is affected by optical zoom
To record videos, images need to be projected on the cameras image sensor. Earlier models used electron tubes, todays cameras use semiconductor based sensors, CMOS for example.
The optical zoom is basically a telescope in front of the camera. Typical magnification rates are 25x for TV cameras, 50x for sports objectives and 100x for telescopes. Though, there is no limit for optical zoom.
But, the image quality decreases with increasing zoom level. Two problems occur when zooming in: chromatic aberration and blur.
Chromatic aberration causes the image to be divided into all its different colors, comparable to the colors in a rainbow. Because each color has a different index of refraction, each color channel of the image appears to be at another position. For video cameras only red, green and blue are of importance. So the chromatic aberration in video cameras causes the color channels to appear at different positions on screen.
There are three different ways to reduce the chromatic aberration: moving the channels with software to the right position, using higher focal lengths, which makes the cameras bigger and using so called “optical glass” as lens, which is lighter than normal glass and therefore has a reduced refraction. Pure quartz glass is a very good optical glass. Non-optical glasses are also made of quartz glass but with additives, that lower the production cost.
Blur is another problem that occurs when zooming in. This has to do with the wave nature of light and the probability of sharp light getting through the lens. When the diameter of the aperture is too small, not enough light gets trough to make the image appear sharp. Photographers might experience the opposite effect, which is due to enhanced depth of field. When the aperture size is too big, there is too much light, which doesn’t appear as a sharp image.
Smaller exposure times can compensate too much light. Though long exposure time cannot compensate too small aperture sizes and may cause noise in the image. For RGB cameras orange objects cause the most image noise and white objects like walls and buildings cause the least noise.
Finally, it’s hard to tell which camera zoom objective to use for a certain purpose. It is highly recommended to try before you buy, because there are other quality aspects and design issues to consider.


Samstag, 26. April 2014

How is video image stabilization working?

Video Image Stabilization explained

The process of video image stabilization removes undesired vibrations from a video recording. There are two different types of stabilizers: hardware and software based stabilizers. Hardware based stabilizers use electromagnets to stabilize the image by moving optical lenses and prisms. Software based stabilization detects image features, such as object contours, highlights  and shadows and tracks its movement. In this article software based stabilization is explained.

Software based video image stabilization takes place in just three steps, feature detection, movement calculation and movement correction.

First, notable features of an image are detected. Features are regions of an image, which catch the feature detectors attention. There are several different feature detectors available to the public, which are known since the 1980s, for example, “good features to track”.

The movement detector compares two or more images and calculates the movement of each feature.

Then movement correction uses the movement information from the detector to stabilize the image by just moving it in the opposite movement direction.

But, the image moves out of the screen and disappears after some time. Unless you want to do photo stitching, movement of the image is unwanted when recording videos. Though the image movement can be used to measure camera rotation. The resolution of video cameras is far higher than the accuracy of potentiometers or acceleration measurement chips. Video cameras can detect movement of just a few arc seconds.

To avoid moving the image out of the visible screen, the movement detector has to distinguish between camera movement and vibrations. This is done by statistical analysis of the movement, which is comparable to distinguishing the volatility from the moving average of a stock chart. Sophisticated image stabilizers use fast Fourier or cosine transform to move the image into the right position before a shock occurs.

Moving objects confuse the image stabilizer, so moving objects have to be excluded from the stabilization process. By discriminating regions of different movement directions, the image stabilizer can detect moving objects like cars, clouds and swarms of birds and recognize them even in front of a moving background.

Camera rotation is also confusing for the image stabilizer and is far more difficult to exclude from the stabilization process than the problems mentioned above. Because the center of the rotation may be outside of the field of view and the background may move while the camera is rotating, additional statistical analysis is required, which can slow the image stabilizer down. When there is not sufficient computing power, the software can just make a guess.

Finally, stabilized video images are much easier for the eye to watch and increase the compression rate of video streams and files. Watching stabilized videos can reduce stress and help lower the cost of disk storage and data bandwidth.

Dienstag, 18. Dezember 2012

How to configure outgoing connection rules in the Windows 7 firewall


The Windows 7 firewall accepts or blocks all outgoing connections. It is not possible to allow specific connections only. The firewall rules have no effect.

Too bad. Most backdoors in use nowadays wait until an outgoing connection is possible and then connect to the infested remote computer.

Though there is a workaround to block all outgoing connections and leave some trusted remote ports open.

Simply block every protocol and leave the trusted remote ports open:


  • In the Windows Firewall Properties turn the firewall on for every profile.
  • Block incoming connections (default)
  • Accept outgoing connections (default)


Windows 7 firewall outgoing rules example
(Example: outgoing firewall rules with exceptions) 

Samstag, 27. Oktober 2012

Palkotools Sphinx 2.0 Video Monitoring Software

Palkotools released Sphinx 2.0 Video Monitoring Software on Oct 18th. Unlike other video surveillance software available, Sphinx 2.0 digitally signs recorded video images to prevent unauthorized changes.

For the creation of digital signatures, asymetric and symetric ciphers are used. The key size is adapted to the speed of todays CPUs and uses multithreading for signing and verfication of signatures. Several hundred alerts can be verified in just a view minutes. For security reasons a proprietary format for keys and signatures is used.

The movement detector of Sphinx 2.0 was built with the leading computer vision library OpenCV 2.4.2.

The security software is available as a download: Download Sphinx 2.0 Video Monitoring Software

View Screenshots here: All about Sphinx 2.0 Security Software

Montag, 9. Juli 2012

Introduction to the Open XML SDK 2.0

The Open XML SDK 2.0 is Microsoft's API for the Open File Formats of the Microsoft Office Products like Word, Powerpoint and Excel.

The documentation of the SDK contains many examples and provides a good starting point to muddle through the SDK. Though the file formats are specified but not documented. An expert is required to perform data import and export tasks on office documents.

The office file format itself is a compressed XML document. In my opinion the XML schema of the Office file formats is far more complex than let's say HTML5.

Once you are an expert on the Office file format you can create serial letters, compose large documents from single documents and data sources like project management tools and ERP systems and import data into Excel Reports.

See the Open XML SDK 2.0 in action: Historical stock data with 3D chart

Link to the online documentation: MSDN Welcome to the Open XML SDK 2.0


Sonntag, 19. Februar 2012

64 bit Notebook Processors with VT-x and AMD-V March 2012

See what's under the hood of a developer's notebook this spring.
Find a list of mobile 64 bit notebook processors of Intel and AMD supporting virtualization AMD-V and VT-x here.


Intel 64 bit Notebook CPUs with VT-x

2nd Generation Core i3, i5, i7
All Models
The 2nd gen Intel® Core™ mobile processor family delivers a visibly smarter PC experi-ence. Whether you use your PC for digital media, gaming, play, or everyday tasks, these new processors deliver even more performance automatically when you need it and now offer a better visual PC experi-ence built-in. The 2nd gen Intel Core mobile processors make it easier for you to design, edit, play, share, and enjoy—smarter than ever before.

Core 2 Quad Mobile
Q9000 / Q9100
Intel® Core™2 Quad mobile processors for laptop PCs are designed to handle compute and visualization workloads, along with extending battery life for multitasking and multimedia on the go.
Providing bandwidth for multi-threaded applications, Intel Core 2 Quad processors are built on previous-generation 45nm Intel® Core™ microarchitecture enabling faster, cooler, and quieter mobile experiences.

Core 2 Extreme Mobile
QX9300 / X7800 / X7900 /
X9000 / X9100
Designed for gaming and HD multimedia, previous generation Intel® Core™2 Extreme processors deliver a great option for HD digital content creation, HD multimedia, and gaming. These laptops provide the responsiveness and realism you need on the go.

Core 2 Duo Mobile
L7200 / L7300 / L7400 / L7500 / L7700 / P7370 / P7570 / P8400 / P8600 / P8700 / P8800 / P9500 / P9600 / P9700 / SL9300 / SL9380 / SL9400 / SL9600 / SP9300 / SP9400 / SP9600 / SU9300 / SU9400 / SU9600 / T5600 / T6670 / T7100 / T7200 / T7250 / T7300 / T7400 / T7500 / T7600 / T7700 / T7800 / T8100 / T8300 / T9300 / T9400 / T9500 / T9550 / T9600 / T9800 / T9900 / U7500 / U7500 / U7600 / U7600 / U7700
The Intel® Core™2 Duo processor is Intel's second-generation mobile dual-core processor designed to deliver breakthrough performance and great power savings. With an Intel® Centrino® processor technology-based laptop with the new Intel Core 2 Duo processor and 4 MB cache, you can enjoy a greater than 20% performance increase when doing processor-intensive tasks like multitasking compared to previous-generation laptops with Intel® Core™ Duo processors.

Celeron Mobile
787 / 797 / 807UE / 827E / 847 / 847E / 857 / 867 / B710 / B720 / B800 / B810 / B810E / B815 / B840 / P4500 / P4505 / P4600 / SU2300 / U3400 / U3405 / U3600
Designed for gaming and HD multimedia, previous generation Intel® Core™2 Extreme processors deliver a great option for HD digital content creation, HD multimedia, and gaming. These laptops provide the responsiveness and realism you need on the go.


Check intel processors here before you buy: Intel VirtualizationTechnology List


AMD 64 bit Notebook CPUs with AMD-V

"With the exceptions of Sempron-branded processors and Turion K8 Rev E processors, all notebook processors shipped by AMD include AMD-V" (AMD)


Turion X2 Ultra/X2
Highest bandwidth and long battery life. AMD's non plus ultra.
For the newest operating systems.

Turion Neo X2
Designed for todays affordable ultrathin notebooks for HD video, online 3D gaming, and today’s most demanding applications. For the newest operating systems.

Athlon Neo
Designed to enable today's latest ultrathin notebook designs.
For Windows® Vista, XP x64, XP Professional, XP Home, 98, NT
Fusion A8, A6, A4, E2 Series (model number ends with M and MX) based on Llano Architecture
Designed for netbooks and notebooks. Combines AMD CPU and ATI graphics power on one chip, which is called APU and stands for Accelerated Processing Unit. 64-bit is supported.

Athlon X2
Supports better multitasking and better overall processor performance because each core has its own L2 cache memory. 
For Windows® Vista, XP x64, XP Professional, XP Home, 98, NT

Athlon 64 X2
For Windows® Vista, XP x64, XP Professional, XP Home, 98, NT


Check AMD processors here before you buy: AMD Processors for Notebooks


Mittwoch, 8. Juni 2011

How to compute the hash code of a file using C#

Hash codes are usefull to find objects in a databas and to check the integrity of a file. This article shows how to compute the RIPEMD-160 checksum of a file using C#

Code sample

The following code sample shows how to compute the checksum of a file using C#. The ComputeHash Method of the RIPEMD160 object creates the hashcode and returns a byte array. The byte array is then transformed to a string of hex numbers.

using System;
using System.Text;
using System.IO;
using System.Security.Cryptography;

namespace HashCodeTut
{
    class Program
    {        static void Main(string[] args)
        {
             if 
(args.Length == 0)
                 return;

             string 
hashcode = ComputeHash(args[0]);
             Console.WriteLine(hashcode);
        }
       

        static string  ComputeHash(string filename)
        {
             FileInfo 
fi = new FileInfo(filename);
             FileStream fs = fi.OpenRead();

             RIPEMD160 ripemd = new RIPEMD160Managed();
             byte[] hashbytes = ripemd.ComputeHash(fs);
             fs.Close();
         
             StringBuilder
sb = new StringBuilder();
            
             foreach (byte hb in hashbytes)             
                 sb.AppendFormat(
"{0:X2}", hb);
           

             return sb.ToString();
        }
    }
}

Hash function benchmark

Find a benchmark of the hashing functions RIPEMD160, SHA1, SHA256, SHA384, SHA512 and MD5 here:
Benchmark of hash functions included in Microsoft .Net Framework 4

DiskHash File Compare Tool

The DiskHash File Comper Tool creates hashcodes to detect file system changes.
Download: DiskHash v1.0 File Compare Tool

Donnerstag, 2. Juni 2011

Tutorial 4: How to import RSS feeds into MS SQL 2008 (Part 4)

Part 1 | Part 2 | Part 3 | Part 4

The foregoing parts explained how to create the SSIS package to import 
RSS feeds. The 4th and last part of this series covers how to setup the database
tables and stored procedures, which are called be the import package.


The headline table

The table 'fan.TutorialHeadline' is the destination of the RSS feed import. See
it's definition below.

-------------------------------------
-- final import destination
-------------------------------------

CREATE TABLE fan.TutorialHeadline
(
     
id int PRIMARY KEY IDENTITY (0,1),
     
publisher varchar(50),
     title
varchar(255) NOT NULL,
     
content varchar(MAX) NULL,
     import_date datetime  DEFAULT GETDATE(),
     
linkurl varchar(255) NOT NULL,
     merge_hash
binary(16) NULL
) 
ON [PRIMARY]
GO

CREATE
NONCLUSTERED INDEX [Ix_merge_hash] ON [fan].[TutorialHeadline]
(
     
[merge_hash] ASC
)
GO


The import buffer table

To avoid duplicate entries we do not update the headline table directly. We
import the RSS feed data into another import table and merge just the missing
rows into the headline table. In this tutorial the definition of both the
headline and the import tables are identical. See the definition of the import
table below.

-------------------------------------
-- import buffer table
-------------------------------------

CREATE TABLE fan.TutorialImport
(
    
id int PRIMARY KEY IDENTITY (0,1),
    publisher varchar(50),
    title 
varchar(255) NOT NULL,
    content varchar(MAX) NULL,
    import_date datetime DEFAULT GETDATE(),
    linkurl varchar(255) NOT NULL,
    merge_hash binary(16) NULL
) ON [PRIMARY]
GO

CREATE
NONCLUSTERED INDEX [Ix_merge_hash] ON [fan].[TutorialImport]
(
     
[merge_hash] ASC
)
GO


The hashing function

You may have noticed the indexed column merge_hash in both tables. Hence RSS
doesn't provide a unique ID to identify a RSS data item, I create a unique
hashcode, which is calculated from the feed title and content using MD5. The
function is used by the stored procedure which imports the data. See the
function definition below.

-----------------------------------
--- hash function
-----------------------------------


CREATE
FUNCTION fan.TutorialHash
(@title varchar(100), @content varchar(MAX))
RETURNS binary(16)
AS
BEGIN
    -- create merge hash
    
DECLARE @hash binary(16);
    DECLARE @tc8000 varchar(8000);    SET @tc8000 = CONVERT(varchar(8000), cast(@title as varchar(MAX)) + ' ' + @content);
    SET @hash = CAST(HASHBYTES('MD5',@tc8000) AS binary(16));
    RETURN @hash
    END
GO


The import procedure

The stored procedure 'fan.TutorialAddHeadline' is called by SSIS package
created in the previous parts of this tutorial. The procedure is executed for
each item in a RSS feed. It creates the unique hashcode and creates a new row in
the import buffer table.

------------------------------------------
-- TutorialAddHeadline procedure
------------------------------------------

CREATE
PROCEDURE fan.TutorialAddHeadline
@title
varchar(100), @content varchar(MAX), @publisher varchar(50), @linkurl varchar(255)
AS
BEGIN
    -- create merge hash
    
DECLARE @hash binary(16);
    SET @hash = fan.TutorialHash(@title, @content);

    -- create headline    INSERT INTO fan.TutorialImport (publisher, title, content, linkurl, merge_hash)
    VALUES (@publisher, @title, @content, @linkurl, @hash);
END
GO


Merge recently imported and existing data

The stored procedure 'fan.TutorialMerge' copies all rows from the import
buffer table to the destination table. It uses the MERGE command, which is new
in MS SQL 2008. The MERGE command uses the calculated hash code to find missing
rows in the destination table and inserts only new rows. After the merge the
import buffer table is cleared.
This procedure has to be called by SSIS package after the import. The next
step describes how to add this last task to the SSIS package. See the merge
procedure code listing below.


---------------------------------------
-- merge imported and existing data
---------------------------------------


CREATE
PROCEDURE fan.TutorialMerge
AS
BEGIN
    MERGE 
fan.TutorialHeadline h USING fan.TutorialImport m
    ON h.merge_hash = m.merge_hash
    WHEN NOT MATCHED BY TARGET THEN
        INSERT (publisher, title, content, import_date, linkurl, merge_hash)
          VALUES (m.publisher, m.title, m.content, m.import_date, m.linkurl, m.merge_hash);
    DELETE FROM fan.TutorialImport;
END
GO


Adding the merge procedure to the SSIS package

The merge procedure 'fan.TutorialMerge' has to be executed after the import
to update the RSS data. Follow the steps below to add it to the SSIS package.
1. Add a new 'Execute SQL' taks to the SSIS package
2. Click on the foreach loop container and wait for the arrow to appear. Then
drag it on the 'Execute SQL' task
3. Right click the 'Execute SQL' task and choose edit
4. Make sure the task connects to your database and then edit the attribute
SQLStatement and enter the following code. Replace 'CelebrityDB' by your
database name.

USE CelebrityDB -- replace db name
GO

EXEC fan.TutorialMerge


5. Click OK to close the editor

The SSIS package is now complete. You can now deploy it on the server. When
you execute the package,  it should look like the one on the image below.

Executed SSIS package:


Final Result

After the import the RSS feed data is stored in the table 'fan.TutorialHeadline'.
You can read the RSS feeds now with your SQL Server Management Studio.

Result of the RSS import:


Thank you for reading this tutorial!

More tutorials are coming soon. Your feedback helps me a lot to improve this
blog. Please leave a comment!

Mittwoch, 1. Juni 2011

Tutorial 3: How to import RSS feeds into MS SQL 2008 (Part 3)

Part 1 | Part 2 | Part 3 | Part 4

In the previous part of this tutorial you created the script tasks and
containers to download RSS feeds and iterate through every XML file. This part
shows the code listing of the earlier created RSS import Script Task inside the
Foreach Loop Container.

Place the following Code listings inside the RSS import Script Task.

Using Directives

Add the following using directives at the top of the C# script.

using System.Data.SqlClient;
using System.Data.SqlTypes;
using System.Xml;


ScriptMain class

Replace the existing Main() method by the following code. The Main() method is
executed for each XML file in the earlier specified folder. If you are familiar
with ADO.Net programming, notice how different the Connection object is created
and that it's Close() method is never called. The SQL import itself is done by
the AddHeadline() method. It's called for every item in the RSS feed XML file.
The method calls a stored procedure named 'fan.TutorialAddHeadline', which is
described in the next part of this tutorial.

Things you might want to change in the code:

1. Server name: Change 'Data Source=sql1' in the ConnectDB() method to
your server name

2. Database name: Change 'Initial Catalog=CelebrityDB' in the ConnectDB() method
to your db name


private string CurrentFilePath;
private SqlConnection con;

public void Main()
{

      // TODO: Add your code here
      CurrentFilePath = (string)Dts.Variables["CurrentFilePath"].Value;
      try
      
{
         ConnectDB();
         ImportRSS(CurrentFilePath);
         Dts.TaskResult = (int)ScriptResults.Success;
     }
     catch (Exception)
     {
         Dts.TaskResult = (int)ScriptResults.Failure;
     }
 }


private void ConnectDB()
{
    ConnectionManager cm = Dts.Connections.Add("ADO.NET");
     cm.ConnectionString =
 "Data Source=sql1;Initial Catalog=CelebrityDB;Integrated Security=SSPI;"
;
     con = (SqlConnection)cm.AcquireConnection(null);
 }


private void AddHeadline(string pTitle, string pContent,string pPublisher, string pLinkurl)
{
     SqlCommand c = con.CreateCommand();
     c.CommandType = CommandType.StoredProcedure;

     // Enter name of your stored procedure here
     c.CommandText = "fan.TutorialAddHeadline";

     // Change parameter names of  your stored procedure here
     SqlParameter sqlTitle = new SqlParameter("@title", pTitle);
     SqlParameter sqlContent = new SqlParameter("@content", pContent);
     SqlParameter sqlPublisher = new SqlParameter("@publisher", pPublisher);
     SqlParameter sqlLink = new SqlParameter("@linkurl", pLinkurl);

     sqlTitle.Direction = ParameterDirection.Input;
     sqlContent.Direction = ParameterDirection.Input;
     sqlPublisher.Direction = ParameterDirection.Input;
     sqlLink.Direction = ParameterDirection.Input;

     c.Parameters.Add(sqlTitle);
     c.Parameters.Add(sqlContent);
     c.Parameters.Add(sqlPublisher);
     c.Parameters.Add(sqlLink);

     c.ExecuteNonQuery();
}


private void ImportRSS(string filename)
{
    XmlDocument doc = new XmlDocument();
    doc.Load(filename);

    XmlNamespaceManager xnm = new XmlNamespaceManager(doc.NameTable);
    xnm.AddNamespace("dc","http://purl.org/dc/elements/1.1/");

    XmlNodeList itemList = doc.GetElementsByTagName("item");

    XmlNode xcurrent, xtitle, xlink, xdescription, xcreator;
    string title , content, publisher, link;

    for
(int i = 0; i < itemList.Count; i++)
    {
         xcurrent = itemList[i];
         xtitle = xcurrent.SelectSingleNode("title");
         xlink = xcurrent.SelectSingleNode("link");
         xdescription = xcurrent.SelectSingleNode("description");
         xcreator = xcurrent.SelectSingleNode("dc:creator", xnm);
         title = ""; content = ""; publisher = ""; link = "";
         if (xtitle != null)
             title = xtitle.InnerText;
        if (xdescription != null)
            content = xdescription.InnerText;
        if (xcreator != null)
            publisher = xcreator.InnerText;     
        if (xlink != null)
            link =  xlink.InnerText;

        AddHeadline(title, content, publisher, link);
     }
 }


Next: Tutorial Part 4

In the next part the stored procedures and tables are created and the imported data is merged using the new MERGE SQL Command.

Tutorial 2: How to import RSS feeds into MS SQL 2008 (Part 2)

Part 1 | Part 2 | Part 3 | Part 4

Part 1 explained how to download RSS feeds and save them into a folder. This part covers how to wait for all downloads to complete and iterate through all downloaded files.

Wait until all downloads are completed

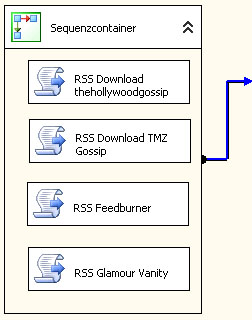
In the previous part we created several independent script tasks to download RSS feeds. They are executed concurrently. Before we can import the data we have to wait till all script tasks are finished. The logical object, which represents all tasks as a whole is the Sequence Container. It will be used later to define
the Precedence Constraint.(blue arrow in the image)

1. Create a new Sequence Container

2. Put all Script Tasks into the sequence container

3. Make sure the properties FailPackageOnFailure and FailParentOnFailure are set to 'False' because we don't want the package to fail when a single website is temporarily offline.

All script tasks put into a sequence container:


Iterate through all downloaded XML files

The Foreach Loop Container iterates through all files in a specified folder
and passes the filename as a parameter to another Script Task, which imports the
XML data.

1. Create a Foreach Loop Container and edit it using the Container Editor

2. On the Collection page choose the file-enumerator

3. Enter the path of the folder where the downloaded RSS feeds are saved

4. Enter into the field Files: *.xml

5. Select full qualified filenames

6. On the Variables Mappings Page create a new variable with index 0 and name
'CurrentFilePath'. It should be located in namespace 'Package' and should be of
type 'String'

7. Done, click OK to close the editor.


Add the Precedence Constraint

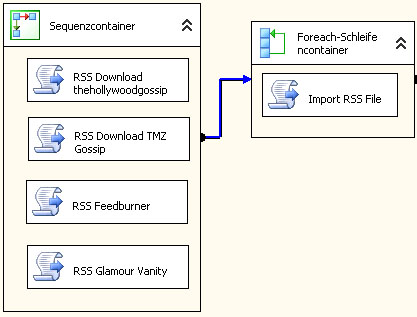
In this step we add the precedence constraint, which tells the foreach loop
container to start iterating through all files when the downloads are completed.
Though the foreach loop ist still empty. The XML import task will be added in
the next step.

1. Click on the Sequence Container, we created earlier and wait for the green
arrow to appear

2. Drag and drop the green arrow on the Foreach Loop Container

3. Right click on the green arrow and choose edit.

4. Set it's Evaluation Expression to Constraint

5. Set it's Value to Completion

6. Select Logical AND and click on OK to close the Editor


Create the Script Taks for the XML import task

1. Create a Script Task and place it inside the Foreach Loop Container

2. Right click on it and choose edit

3. Insert 'CurrentFilePath' into the ReadOnlyVariables Property

4. Click on OK to close the editor

The package should now look like the image below.

Package with empty Script Task for the XML import:


Next: Tutorial Part 3

The next part shows the code listing of the RSS Import Task

Tutorial 1: How to import RSS feeds into MS SQL 2008 (Part 1)

Part 1 | Part 2 | Part 3 | Part 4
RSS 
or Really Simple Syndication is a standardized XML format for publishing web 
blogs or frequently updated web sites. MS SQL 2008, out of the box is capable of importing XML files. Though the built in tools raise errors when trying to import RSS feeds. This article offers a brief tutorial on how to download and import RSS feeds from a webpage using the SQL Server Business Intelligence Development Studio.


What can you do with RSS feeds?

First of all there are numerous applications which can download and view RSS
feeds. So what can you do with SQL? The main reason why you would want to import
a RSS feed into a database is to do further processing, send notifications or
apply filters on one or more feeds. Media monitoring is one possible use case
for importing RSS feeds into a database. SQL server allows you to search in RSS
feeds for brand names, company names, subjects matters, persons and any other
keyword and use the information for report generation.

What do you have to consider when processing RSS feeds?

When you consume RSS feeds you have to consider the terms and conditions of
the RSS publisher and the copyright laws of the publishers country. In many
cases the publisher may not want you to publish the feed data on a website or
intranet portal. Though in countries like Austria and Germany a company is
allowed to create paper copies of the publishers data for their own use. So
aggregating the data and showing them on a printable report is a possible
solution.

Tutorial: How to download and import RSS feeds into MS SQL 2008
This tutorial is written for developers and IT professionals who are familiar
with SQL Server Business Intelligence Studio and SQL. It shows first how to
download and parse the RSS feed using a SSIS package and shows then how to setup
the database table and procedures.

Downloading RSS feeds

1. Create a new Integragtion Services Project using the SQL Server Business
Intelligence Studio.

2. Then add a new script task and edit its source code. I use C#

3. On top of the script place the import of the System.Net Namespace if it's
not already there.
using System.Net

4. Add the method DownloadFeed below the Main() method and replace the URL
and filename. The URL is the RSS feed URL. The filename is the destination,
where it will be stored. In this tutorial all feeds will be saved in the same
folder. The import routine then reads all RSS XML files in the folder.
public bool DownloadFeed()
{
  WebClient web = new WebClient();
  try
  {
    web.DownloadFile(
      @"http://feeds.thehollywoodgossip.com/TheHollywoodGossip?format=xml",
      @"e:\import\TheHollywoodGossip.xml");
    return true;
  }
  catch (WebException)
  {
    return false;
  }
  finally
  {
     web.Dispose();
  }
}

5. Insert the following code into the Main() method
public void Main()
{
  // TODO: Add your code here
  if (DownloadFeed())
    Dts.TaskResult = (int)ScriptResults.Success;
  else
    Dts.TaskResult = (int)ScriptResults.Failure;
}

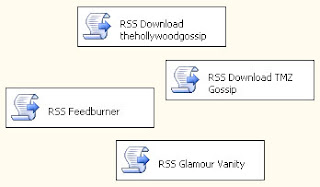
6.Repeat steps 1 to 5 for each xml feed you want to download and save your
package. The main advantage of creating seperate script tasks for each RSS feed
is that they can be executed parallel. The final result should look like the
image below.


The created script tasks:


Next: Tutorial Part 2 

Learn in the next part how to parse the RSS xml files after downloading.